Monday, September 9, 2013

Day 76 & 77, Lots of finish activity and our first Saturday work day


ABOVE, Rich and Esduardo erect the scaffolding for the next phase of stonework.


Rich off loads all the material needed to install the stone veneer.


ABOVE, Esduardo luges the scaffolding boardsinto the house. 


RIGHT, Rich changes out his diamond cutting blades in preparation for the day installation phase.


The job site is ready and the mortar is being mixed in preparation for the day's installation. 


The stone are then staged on the scaffolding in order setting them in their permanent position.


Builders and contractors confer with owner. Craig before he leaves to do two building audits in the Marysville area and the Sierra's community of Downieville. He then plans to visit his Dad in Lake Tahoe. The red Porsche will get it new tires a broke-in. The trip is planned to be almost 400 mile round trip. This includes marathon video poker playing at the Lakeside Inn, Stateline NV with Tahoe Bob Steele (aka Grampy).


LEFT, the the first tier of corner stones fixed in place. Notice the white spacers used to get a uniform distance between each layer of stone.


BELOW, Rich starts filing in the rest of the stones while paying attention to how it matches the other stonework on the exterior of the house.


What transpires is this beautiful stone work accenting our fireplace. 

 
I have a new appreciation for the craftsmanship necessary to  get this kind of result. 

 
Sandy and I love what has been created here.


One of the things we noticed about the construction routine was our front door was always left open all day allowing flights of winged critters access to our house's interior. The majority of them ended up buzzing our windows till their demise. Unless Sandy swooped them up and out of their prison including one wasp.


We needed a solution; so I surfed the internet and found Jeff of Sunset Screens. Darrell and him worked on the details of his product and how to install it on the front door allowing critter free air to ventilate the interior spaces. Sandy approved the finishes and budget. She placed an order to add a pull out screen on our front door.


One of the necessary tools in construction is not the power plug-ins. It's the music box playing Country that must be on all day to motivate the builders as they do their work.


I am even getting use to the trials and tribulations of the Country conscienciousness. Yea-Haw!


Another treat to the job site is the D-Built Business Manager, Michelle, (aka Darrell's lovely wife). We do get the impression who is really in charge of this operation.


LEFT, Darrell discusses the finish details on a new mantle piece to cap the fireplace in the Family Room.


I never notice the unique stone used to surround the fireplace. I has ancient fossil shellfish embedded in the stone bricks.


BELOW, shows how the builders moved the pendent light over three inches to miss the cabinet door swing. I can learn so much from how these builder figure out where things are installed.


RIGHT, Darrell and Dad are installing the bead board on the one of the Living Room walls


BELOW, Stacy works on the bead board install as he measures to install the chair rail cap.
ABOVE, we have a builder consult on achieving the right look for the window and how they merge the chair rail with the window molding.


Then there is Mikey, the electrical contortionist, what a lay back job this guy has...


Just kidding, he is getting the under cabinet lighting just right so the LED covers the worksurface just right.


NEXT is our first Saturday working day. Rich wanted to work to complete his stone installation. 

Darrell needed to have a tape and texture guy come back and fix several patches to walls and ceiling.


The following is the Saturday Workday at the Wikiup Project


Darrell explains what areas need to be repaired and prepared to be re-painted.

RIGHT, the moving of the pendent light hole over three inches needed a patch to fixed the old opening.


Rich and Esduardo worked all day to complete the stone setting. 


BELOW, makes a cut using the monster diamond saw. We had to plug it into laundry room dryer outlet to run this tool.

ABOVE, Rich and Esduardo brag that their stone works looks far better then the picture we used for the last year to visualize the end result. the fireplace is one of our center piece of our Wikiup Project.


RIGHT, Darrell vacuums the job site in prep for next week. He and Michelle are off on an adventure so Darrell is playing hookey on Monday.


NEXT, I am gone to Stockton this week for work till Thursday. What's next is the final seating of the ledge stones on the fireplace, installation of the last two windows for the master bedroom and studio, and more molding trim installation. Also, the flooring may start this week...


Day 75, Mikey is not the bolt Guy


Today we got to the bottom of where the bolt and washer; that cost us a new set of tires for the red Porsche 911. It was not Mikey as demonstrated by the photo to the RIGHT, his bolts are different from the one dislodged from the Porsche rear tire.

Sorry Mikey!!!


This morning starts with the stone work on the three-sided fireplace. Rich and his crew starts at 7AM. So Sandy and I rise early to feed the  animals wanting their breakfast.  We had a fleet of white trucks in the driveway before the sun shines into my office.


BELOW, Rich Worden, left, His nephew, Dave, middle and construction helper, Esduardo, right


The morning scope of work is discussed with the owner. Rich explains that a wire mesh needs to be clad around the areas to be covered with the rock veneer.


BELOW, Rich sizes up the wire to be the base for the scratch coat for the mortar used to adhere the stone to the fireplace base and chimney.


LEFT, Rich is troweling the mortar onto the wire screen in prep for the next steps


BELOW, Rich and Esduardo, size up all the ledge stones that cap the top of the base. You have to cut these stones with a special diamond saw and then dress up the exposed edge with a rough cut edge to add to the ambiance of the finish look.

ABOVE, notice Darrel in the background working on Sandy's antique room wainscoting.


BELOW, the fireplace is already for the next phase tomorrow the application of the stone veneer. This is where all the hand picked pieces will be arranged to match the existing exterior stone work and columns.


RIGHT, Darrell mocked up a sample of the the bead board and proposed chair rail cap.

BELOW, this is an example of what the crown molding will look like installed over three windows in the Living Room.


Darrell, with the owners approval to proceeds, he lays out the rough measurements to start the install. 


Note we removed the baseline heating system. 


We assured by both Darrell and Stacy; who have similar fireplaces; that we will have no problem heating the Kitchen, Dining, Entry and Living room spaces.


 Here the builders discuss the various cuts needed to install the crown molding on top of each kitchen cabinets. These guys spend a lot of time insuring the molding is an exact fit with no gaps. Rich provides advice based on his 50 years to doing this work.

 ABOVE, Mikey installs the electrical plugs for the wine cooler and exterior electrical access on the counter cabinets as Stacy comments on his under the counter work load.

 BELOW,  Mikey is captured making his energy connections.

NEXT: is more on the bead board and stone work installations
Mikey have you forgiven us about whose bolt and washer ended in the 911's rear tire?


Wednesday, September 4, 2013

Days 73 & 74, Red 911 gets New Boots, Lots of Finish Work before the Floors


This last weekend, Sandy and I were set to go on a little road trip up into Lake County to visit a couple of Indian Casinos. We love to play video poker. When we backed out of the garage and drove down the hill, we heard this destinctive clacking noise coming from the passenger side rear tire.

No flat but we had a big bolt with washer decorating our rear tire.

I called the AAA Roadside assistance and they put the space tire on the Porsche. I  liked the red rim.  Hey! Sean can you find a set of matching Red Rim? Anyway, we drove down to the local Firestone store to get a quote to fix the tire. Turns out both rear tires were bald on the inside tread and needed to be replaced. The front tires were at the end of their life cycle as well. So the Red 911 got new set of Hankooks V-12 all the way around. I got a great holiday price including full warranties on all tires.


I posted the question to the builders as to who was the culprit? 

One of them stepped forward with one name who was the likely person of interest.

We will investigate this accusation  next time this person is at the job site.


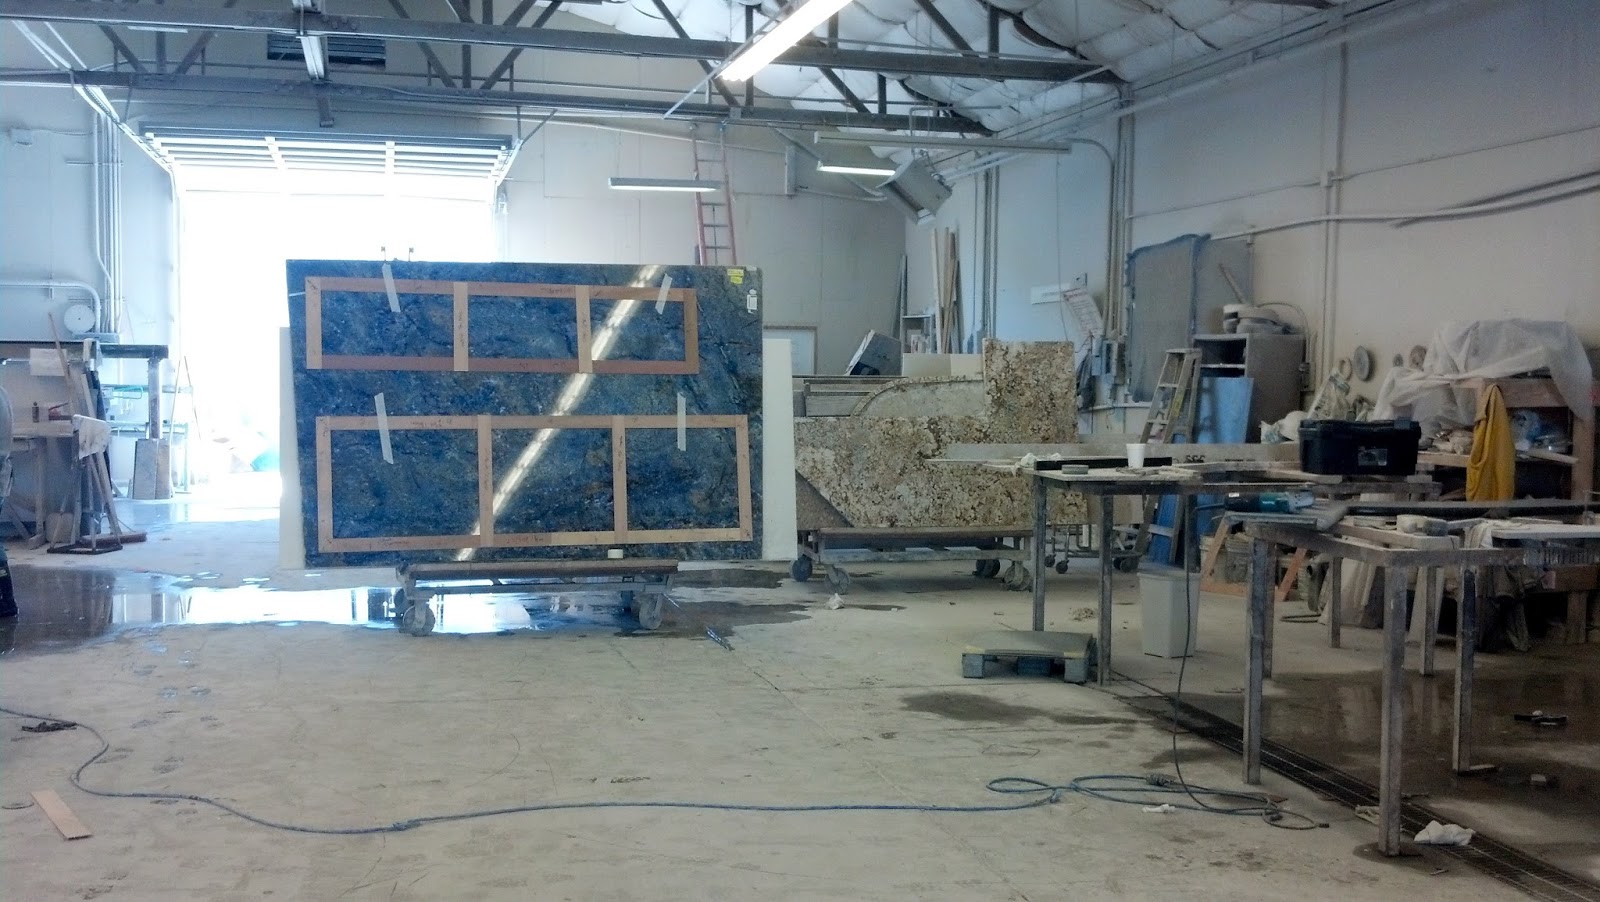
Today, Sandy and I got a change to visit Silver Creek Tile and Stone. I have introduced you to Steve (Bubba) the general manager and head fabricator before in a previous blog. RIGHT, is the section of our famous Blue stone. We have not seen it for a while and it was fun to see it prep for cutting and edging.

BELOW, the templates made at the Wikiup site are position on the stone in prep for the fabrication process. We get to select which veins and colorations will be on the island counter or the bath counter and splash board.

Silver Creek is a busy place with lots of granite slabs being processed. Our order will convert four huge stone slabs into all the parts and pieces needed to top our cherry cabinets. BELOW, is the machine that finishes the stone edges. We have selected 3/8" relieved for our standard edge.


Father and son work on the molding trim in the utility room. No Rich is not operating the washer. BELOW, Darrell is reviewing his notes as he stages the sub contractors in the schedule. Currently the stone mason is next to come to the job site.


We are very fortunate that Darrell is also a talent metal worker. He fabricated this angel iron frame that fits around the fireplace so the stone veneer can rest on a metal ledge.


ABOVE, the builders carefully attach the frame with bolts. Not the same one found in my tire.


BELOW, the fireplace is ready for Rich, the stone guy to work his magic and clad our three sided fireplace with a ledge and stone.


Darrell is still calling to get the troops ready for the next building cycle. I am glad he doing other wise Sandy and I would have that chore.

No thanks, Darrell's the Man!


BELOW, the builders are trimming and screwing to fit doors and securely fasten the floors to the underlying structure elements.


This morning I grabbed my shake and sat in the new shower stall seat.

I was getting a feel for my new bathroom and shower.


Sandy walked by not quite awake and was shocked to see me there so she quickly grabbed the camera to document my rest-put... CHEERS!


Darrell and Dad tag team to secure the Family room sub floor to the joists below; so there are no creaky floors.

Darrell is using an auto loading screw driver and Dad follows behind checking each screw is properly seated and at the right depth.


Trimming the windows is another task to be done to add to the finished look of a room almost ready to be lived in.

Check out that nail gun, you don't want to confront these guys when they are pack'n.


Stacy was on door install duty, RIGHT are the French double doors to our hallway. I really love the door standard we set for this project.


One of my jobs to to catch anything that is not according to plan. LEFT, I spotted that the pocket doors for the kitchen pass-thru and hall closet were reversed. The next morning the builders were swapped them and they look fab in their correct locations.

Thanks Guys!


NEXT: is the stone work and perhaps the flooring. 

The granite is in queue to be fabricated this week or early next week.